Friday, October 14, 2011

Eyebrows

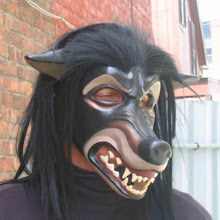
Last month, evil little voices began whispering in my ear and telling me that the deer mask needed big, bushy eyebrows. I stood firm and didn't give in, as next they'd be asking for hairy ears, but I did begin to wonder, maybe the eyebrows did need *something*. Here's the mask with the eyebrows in question:


The first thing I did was to print out the above photo and sketch over the then-current eyebrows with a blue highlighter, to see more clearly what I already had (below.) First thing I noticed was that the eyebrows were asymmetrical. Not that that's a big issue, I think most eyebrows are asymmetrical, but it gave me a place to begin my explorations.


Below, two sketches with symmetrical eyebrows, one with the "left hand" style of eyebrow, and the other with the "right hand" style. I didn't like either of these.


Maybe it was the smooth, unwrinkled skin on the forehead between the eyebrows that was bothering me? I tried sketching wrinkles in between the eyebrows, but I didn't like them either.


Not sure where to go from here, I decided to hit the books. Below is one of my all time favorite reference books in my mask library. It's informative, easy to use, and beautifully illustrated.


Below are illustrations for the muscles responsible for thunderous eyebrows, the corrugator (the two little arms over the eyebrows) and the procerus (the muscle over the nose.)


Below, the actions of the corrugator and the procerus illustrated. To quote from the above book, "...the eyebrow lowers, especially the inner third...The eyebrows move closer together. A cashew shaped lump appears at the inner end of the eyebrow, with a curved, vertical crease along its inside edge (a), the "frown line". A small, crescent shaped dimple appears (b), above the middle of the eyebrow. This is where the muscle attaches to the skin and so becomes a low spot when the muscle contracts......"


I decided I needed to work on my (a) frownline and my (b) dimple. (I toyed with playing with the (c) vertical fold over the eyelid and the (d) hollow at the inner corner of the eye, but that would have meant changing the shape of the eyes more than I wanted to.) So I resculpted the eyebrows and went from this:


To this. I've emphasized the dimples and clarified and moved the frown lines more into the center. I've also tried to show how the muscle pulls the skin and bunches it up over the nose, spending many hours making faces at myself in the mirror and examining the wrinkles to do so! 


Below, a picture of the entire mask with its new eyebrows. I really like how the pattern of wrinkles in the center of the forehead echoes the shapes of the tines over them.

Now, I am really and truly in the home stretch with this mask. With any luck, my next post will show pictures of it finished!

Wednesday, September 14, 2011

Uniporn


Yup, that's my mask. I sold it to a nice gentleman from Lightborne Studios ( http://www.light-borne.com/) in Cincinnati back in May. I have to say, this video came as a bit of a surprise. I've been puzzling over the path my artistic offspring has chosen, and wondering if my parenting skills were too strict, or too lax, or *something*. I mean, we've gone from this:


To this:


Where did I go wrong??

In any case, it gave me a smile!


Thursday, June 16, 2011

Vermont Open Studios & The Flood of 2011


Here is 48 Franklin Street in Barre, Vermont, the home of Sans Souci Studios, with its cheerful yellow "Vermont Crafts Council Open Studio" sign greeting visitors in the front yard. Our visitors were down a wee bit from last year and here's why.

On Thursday, May 26, I went to my "day job" (which usually I do at night) as an on-call residential counselor for young adults with mental health and substance abuse issues. It was starting to thunder and lightning when I drove a group to an acupuncture session in Montpelier, and while I waited in the car, half inch hail began to fall. I drove the group back through torrential rain and when I got back to work, was told that a tornado had passed within a few miles of the facility. One of my coworkers asked if I wanted to stay until the rain subsided a bit, but I wanted to get home in time for my daughter's storytime. We were, after all, reading Harry Potter! The water on the roads was like nothing I had ever seen before, but I made it home safely.

On Friday, May 27, the last day before Open Studios, I woke up to learn that my daughter's school had been cancelled and to find three inches of water in the basement. This made me very crabby. Of course I had left all sorts of Open Studio tasks to the last minute, and I really didn't want to spend my day entertaining Isabelle and bailing the basement out in addition. Then I went online to check the news. I discovered that something like five inches of rain had fallen in two hours the night before. All but two roads in and out of Barre had been closed due to flooding, and several had washed away. Several hundred people had been evacuated from their homes during the night. Property damage would eventually amount to 6 million dollars, with around half a dozen homes being condemned and 70 to 80 percent of the trailers at a local trailer park rendered uninhabitable. Suddenly I didn't feel quite so crabby anymore.

Below, downtown Barre as the flooding began, and beneath that, route 302 just outside of Barre early the next day. (Times-Argus pictures.) Half of one lane of 302 ultimately washed away.


Open Studios looming or not, I had to take a break to walk downtown and see what had happened myself. Below, a tractor clears mud from the intersection of route 302 and 14, while a vactor suctions out a storm sewer.


Below, the National Guard directing traffic around a flooded area, with dust blowing in the background. I was really struck by the dust- when all that mud dried, it turned into dust and blew away, so that Barre was a perpetual sandstorm for the next several days.


Below, a car stuck in a sinkhole in downtown Barre. (Times-Argus picture.)


The week after Open Studios I had the insatiable desire to see the damage to roads I drove on routinely, so I would park my car at the "Road Closed" sign and walk to the washed out area to take pictures. Below is Muddy Brook Road, partially repaired, where I often drove to take Isabelle to school. If you look closely you can see a section of yellow-striped pavement turned perpendicularly to the rest of the road by the force of the water.


Below, a picture of Muddy Brook Road I found online (not sure who took it) taken the morning after the flood.


The road most relevant to me, however, was route 14 between Barre and East Montpelier, as this is the way I drive to work, and the way I had come home the night of the flood. After parking my car at the "Road Closed" sign and walking a loooong way in the heat, this was my first sight of the damage.


I got closer so I could begin to see the culvert the workmen were replacing.


And then when I got closer still, I could appreciate that this hole, even though the workmen had been dumping truckloads of dirt in it nonstop for a week, was still deep enough to fit my entire house.


OK, ladies and gentlemen, the moral of this story is, never drive in water running over the road in a flood. You can't tell how deep it is or even if the road is still there under the water. I got lucky, and I feel more than just a little queasy thinking about quicky the road washed out after I'd driven over it. Below, pics of route 14 right after the flood. (First pic from an unknown web source, the second from the Times-Argus.)


So, until next time, stay safe and well!

Thursday, April 14, 2011

Almost There


The deer mask is almost there! Here it is in its current state. As you can see, the mask has more detail and a smoother surface texture than it did in the previous post. I made lips, eyelids, wrinkles, etc with a layer of Paperclay, and filled smaller irregularities with a layer of Polyfilla. Both of these materials sand beautifully, and the Paperclay can be carved, albiet gently, with Dremel alumium oxide grinding stones, on a low speed.

Below, the mask with initial applications of Paperclay and Polyfilla.


Below, with eyebrows and other details sculpted in, and antlers removed. Due to the complexity of their shape, the antlers need to be removable and replaceable for both moldmaking and casting.


At this point, I decided I didn't like the ears, and started resculpting them. I wanted the base of the ear to be longer and thicker, the tips to be thinner and more refined, and the openings to be further away from the head.

Below, the antlers in their newly removable state, attached with screws. You can see the scorch marks from the Dremel from when I cut them off initially. The ears are also more refined.


Next step, to get the antlers on straight and even again! Somehow the antler on the right side has sagged noticeably in this process, sigh.


Good thing I get so much moral support from studio assistant Ezzy.

Saturday, March 19, 2011

Deer Antlers, Part 2


Here's the deer mask back in June. I felt pleased and thought all I needed to do was smooth and refine the antlers a little.

Ha, ha.


While I worked on bunny masks and looked at the deer mask just sitting on my workbench for the next several months, I realized the distance from the center of the mask to the tip of one antler was almost twice as far as to the other. Some asymmetry in deer antlers is to be expected, but not this much. Not cool.


So I cut the antler between the innermost and the three outermost tines and rotated the whole thing out a little. Not surprisingly, while the tip of the antler is more properly positioned, the tines are now tilted too far back. I stapled wads of tinfoil to the antler to use as an armature for new improved tines.


Then I took a photo of the mask, which I printed out and folded in half to check the relative positions of the two antlers to each other. The bottom edge of the left hand antler obviously need work, but otherwise, so far, so good.

Then I covered the new tines with Celluclay, cut off the old ones, and refined the rest of the antler a little bit.


I got rid of the lump on the underside of the left hand antler and...


OMG! How could I not have noticed before that the tip of the right ear is at least a half an inch higher than the left ear?? So I carved the bottom edge of the antler up a little...


... and brought up the edge of the left ear.


And here's where we are for the moment.

But wait, look, the second outermost tine on the right hand antler is about an inch longer than its conterpart on the left.... AAAGGGGHHHH!!!!