Tuesday, December 12, 2006

"Chiesatine" Paper Mache


This is my first attempt at "Chiesatine" paper mache, otherwise informally known as cotton-fluff paper mache, fresh and raw from the mold. I owe a huge thank-you to Mathieu Rene, a maskmaker based in Montreal, for emailing back and forth with me about how to do this. (His blogs: www.maskmaking.blogspot.com and www.creaturiste.blogspot.com.)

I have avoided trying the more traditional paper-strip-and-glue methods of paper mache as I didn't think they could pick up the fine detail (gumlines, wrinkles, etc) in my masks. I also felt they would probably be too time consuming for someone who already sinks 20+ hours into each mask. But then I was having trouble finding a material strong enough for the "eyeball" mask shown above- those fragile eyebrows would break as soon as I dropped the mask, no matter what it was made of- so I thought I would give this method a try.

I have to say, I am very, very, very, very impressed- and I mean VERY IMPRESSED- with how strong this mask is. Trimming it was next to impossible. As in, the Exacto knife couldn't touch it. As in, the Dremel could hardly touch it. As in, I had to keep turning up the motor speed, and changing the bits, and turning off the Dremel so that the mask could cool down and not catch fire, etc. Mathieu has told me that I didn't need to use as strong a glue as I did (Weldbond, a kind of white glue on steroids) so for my next attempt I'm going to try some version of Elmer's. But in any case, this mask can survive being dropped on the floor!

I am also very pleased with the detail in the cast. The fluff really did pick up all the little lines and edges quite well. The cast was also very true- no pinholes, blisters, cracks, etc, so unlike the Paperclay casts it required next to nothing in the way of repair. So while this method *was* quite time-consuming, I'm thinking it may take no more time than the Paperclay method, and it will yield a superior mask. I may even come out ahead since the materials are so incredibly cheap.

So very briefly, here's how I did this. First I applied a layer of absorbent cotton, purchased in a roll in a medical supply store, into the mold. I pressed it in firmly with a wet brush, removed as much water as I could with a sponge, and then painted in a layer of diluted glue. After that layer had dried, I applied a layer of cheesecloth, coated that with a layer of diluted glue, and then after THAT layer had dried I applied two layers of torn Kraft paper and coated those with the diluted glue.

I have yet to try this in a large multi-part mold. The big molds do sometimes seem to follow different laws of nature than the smaller ones. We'll see what happens!

Horse Mask "Rival" On the Way to the Moldmaker!!!


I am so excited! The horse/unicorn mask "Rival" is on its way to the moldmaker's, Campbell Plaster and Iron in Rutland, VT! I started this mask over five years ago, I'm so happy it's finally finished. I've posted three pics of it above. Two in its final state, one with the horn and the other without. One in an earlier state (ie, with ginormous ears) showing how it will be worn. The finished production castings will have long luxurious manes and will be attached to a hood, which will fasten under the wearer's chin.

Monday, November 20, 2006

Aves Products and Maskmaking


Well, I have concluded my experiments with Aves products and maskmaking, at least for the immediate future. As a last step, I turned over my Aves Paper Mache/Fixit Paste mask to my Materials Testing Department, aka my three year old daughter Isabelle, and it survived the experiment just fine. Un/fortunately, with all the collections of this that and the other in the house, Isabelle has learned to be very gentle with things so I may have to take a turn beating on the mask myself and see what happens.

I tried casting "Rip" masks in both unadulterated Fixit Paste and a combination of Fixit Paste and Aves Paper Mache. I've found that these masks come out to be about twice as heavy as the Paperclay/Sculpt and Coat masks, which with a mask the size of Rip is wearable but not at all comfortable. (The Paperclay masks come out to be about 8 oz, the Aves masks come out to be about 1 # 4 oz.) It's possible these materials might still have uses in smaller masks, where twice the weight may still not make a noticeable difference.

The Aves Paper Mache (and a similar product, Aves Clayshay) casts like an absolute dream, very easy to handle with no warping or shrinking, though the raw cast does have a lot of pinholes that need to be filled. Unfortunately the Paper Mache (and Clayshay) is much too fragile in the thicknesses required from maskmaking and unless it is reinforced with another material, falls completely apart during demolding. The Aves Fixit Paste is much stronger, but is more difficult to use, having the resemblance that it does to taffy left in a rear windsheild on a summer day. It also does not adhere well to vertical surfaces in a rubber mold, so it pools in the bottom, making for a cast very uneven in thickness. It can be cast over an initial coat of Paper Mache, which helps with this issue somewhat. In my experiments it tended to have fewer pinholes than the Paper Mache, but the ones it has are much more difficult to fix, since the Fixit Putty used to fill them is trickier to handle.

I also tried Aves Apoxie Paste, which is a little cheaper and adheres better to vertical surfaces. When dry, however, it has an unfortunate resemblance to dried snot, not at all what I want my masks to feel like! It's interesting, I hadn't thought of disqualifying a material because of the way it's *felt* before.

Oh well. I was hoping that the decreased casting time for these materials might translate into fewer production hours per mask, and thus lower prices. Since it is very important to me for my masks to be comfortable to wear, however, I think the extra weight disqualifies these materials from extensive usage on my part.

Wednesday, November 01, 2006

Paperclay/Sculpt and Coat Slipcasting


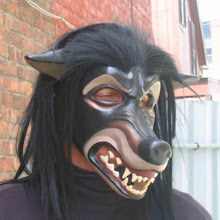
Well, here is the most current method of casting masks at Sans Souci Studios. In general it yields good results. The top pic shows the occasional mess up. This mask is too warped and wrinkled to bother finishing. The bottom pic shows a better than usual cast, nearly perfect, with just some blisters on one side of the muzzle and some missing tooth tips to repair.

So here's what I do. First I make a slip out of Paperclay. (Paperclay used to come in a prepackaged slip form, but it's been discontinued. I never got to try it.) I cut the Paperclay up into 1/2" cubes, place it in a plastic container, pour some water over it, squish it up with my fingers or mash it with a potato masher and then let it sit overnight. If the slip is still too thick the next day I add some more water and repeat the process. Sometimes it takes a few days to get the Paperclay a consistency I like.

I find it useful to have Paperclay slip of several consistencies handy. A slip the consistency of pancake batter is best for the first few layers of a cast, since it sticks to vertical surfaces and captures detail well. A slip the consistency of mashed potatoes is best for the subsequent layers of a cast, since it allows thickness to be built up more quickly. It is also useful for filling in big holes and divots in a finished cast. A slip the consistency of heavy cream, applied with a paintbrush, is good for filling in tiny airholes in a finished cast.

Paperclay slip stays fresh nearly indefinitely, as long as it's kept in a sealed container. Why? I don't think I want to know.

In case you're wondering, I use polyurethane rubber molds with plaster mother molds. I do believe slipcasting is *usually* done in plaster molds, so I thought I should mention this!

I don't use any release in the mold whatsoever when I slipcast with Paperclay, I want that stuff to stick! I've gotten some pretty lumpy, wrinkled casts out of molds that have been treated with release, as the pic above shows. It's helpful to wash the living daylights out of these molds- plain old dishsoap works well.

I apply a first layer of the pancake batter slip with a chip brush, dabbing it along the upper edges of the mask and letting it run down into the lower parts. The thinner this first layer is, the better- it really only needs to coat the rubber so that the rubber appears to change color. Any pooled excess can be carefully scooped out with a spoon. When this layer is dry I brush a coat of Sculpt and Coat over it. I resist the urge to fill in any cracks or separations in the Paperclay with more Paperclay until the Sculpt and Coat is dry, as re-wetting it can also cause it to wrinkle and deform.

I apply one or two more layers in this manner (pancake batter slip, followed by a coat of Sculpt and Coat) and then I switch to the mashed potato slip. I apply a layer about 1/8" -1/4" thick, let it dry, and then coat it with Sculpt and Coat, again resisting the urge to fill any cracks or separations with Paperclay until the Sculpt and Coat is dry. And believe me, it takes some resisting, as the cracks are large and plentiful at this stage!

Then, using more mashed potato slip, I build up additional thickness around the edges and other vulnerable parts of the mask, finally fill in the cracks and separations, and apply another coat of Sculpt and Coat. Some of the very deep cracks may require more than one application of slip and Sculpt and Coat. Once everything feels dry I remove the cast from the mold, being careful about parts such as noses and eartips that may have some hidden dampness.

This method of casting is susceptible to hidden air pockets in between layers of Paperclay, especially along the edges of raised areas such as eyebrows, noses, etc. These areas can be very weak and can cave in if the mask is dropped, etc. I check for these by pressing along suspect areas with my fingers, trying to cave them in myself, and filling in any resulting dimples with more mashed potato slip.

Then I clean and repair the cast. I clean edges and seams with an exacto knife, or a dremel if necessary. I resculpt anything that needs resculpting- lost wrinkles, lips, eartips, etc with Paperclay straight from the package. I hold the mask up to a strong light to find any thin spots, which I fill from the inside with the mashed potato slip. I fill divots with more slip and smooth them out with a wet elephant ear sponge. I let everything dry, sand down the outside of the mask (220 grit is usually sufficient, tho 100 grit can be useful for very stubborn lumps and wrinkles) and repeat the process as necessary. Once the mask is the way I want it, I apply a final coat of Sculpt or Coat, inside and outside.

I wipe off the outside of the mask with a damp paper towel to get off any dust before I put Sculpt and Coat on it, as otherwise it can ball up and make lumps in the finish. I brush it on, and then wearing rubber gloves, I smooth it down with slightly dampened fingers. Since the Sculpt and Coat dries very quickly, I apply it to smallish areas (about 2" by 2") and smooth as I go.

I have also experimented with using an initial detail coat of Sculpt and Coat, and my results are mixed. I've gotten some gorgeous casts, but when I get casts with the usual holes, divots, etc I have the extra step of cutting away the dried Sculpt and Coat from the edges in order to repair them. If you do want to try this, just apply the Sculpt and Coat thinly. If it's applied in big thick pools the top will dry but the bottom won't, since the top will have sealed the bottom away from the air.