
Actually, it's been open for a while, as you might have been able to figure out from the colorful link on the sidebar. But I wanted to make a grand announcement on my blog, so here it is. Check it out! stores.ebay.com/Sans-Souci-Studios
Once again I owe a huge thank you to my husband, Brian Wightman. He set up templates of the sales pages and showed me how to update them, which was no small task.
I also owe a thank you to artist Susan Greaves, who helped co-author "Internet 101 for Artists" (Here's a link to it on Amazon). She also has a page of tips for selling artwork on eBay www.susanfgreaves.com/especially_for_artists.htm which is in my opinion is more helpful and concise than the book. And besides, it's free!
Sunday, November 18, 2007
Sunday, November 11, 2007
Sans Souci Studios at Studio Place Arts
Some of my work will be on display during Studio Place Art's annual Member Show, which will run from November 20 through December 29. The opening reception will be Saturday, December 1, from 5:30 PM to 7:30 PM. Studio Place Arts is located at 201 North Main Street in Barre, VT. For more information about Studio Place Arts, please visit http://www.studioplacearts.com/
The pieces I'm planning on exhibiting are shown below. All of them will be there, but not necessarily on display at the same time. I may also submit other work if I get my act together in time!
Hope to see you there!


The pieces I'm planning on exhibiting are shown below. All of them will be there, but not necessarily on display at the same time. I may also submit other work if I get my act together in time!
Hope to see you there!
Saturday, October 20, 2007
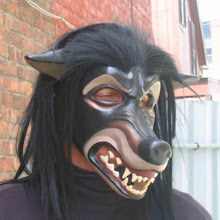
Deer Mask Commission

A gentleman from California asked me if I could do a deer mask for his Halloween event. Only problem is, all I officially have of this particular mask is a half finished prototype, and no mold. How do I make another like it? For the first time in many years, I revisited positive casting. No, postive casting doesn't have anything to do with the artist's cheerful outlook in the studio, but instead has to do with reproducing a form OVER a shape, instead of INSIDE of one. Here's a quick tour of the process:

Here is my prototype mask,carefully covered in tin foil and duct tape, aka Robodeer. The foil on the nose is slit because this picture was taken after the cast was cut away from it.

Here is the beginning of the positive cast, Celluclay rolled out into 1/8" thick sheets and pressed down firmly over the foil-covered prototype. Your basic generic ungulate at this point.


Frankendeer. The cast has been cut off the prototype and reassembled.

Here the cast has been carved and sanded down with a Dremel, and the antlers temporarily attached. The antlers are also a positive cast, from a set of real whitetail antlers.

And here we have once again my long-suffering husband, trying the mask on for size. The poor guy had started to go to bed when I finished strapping and padding the mask, which didn't stop me from trying it on him!
Overall I'm pleased with the way the mask came out, although I wish I had been able to get it smoother. Usually I would have added Polyfilla or Paperclay and sanded it down in order to achieve this, but because this mask was already so big and heavy I worried that adding anything else to it would make it so heavy as to be unwearable. First and foremost, it needed to be wearable.
Wednesday, September 05, 2007
Artist Statement Updated!!!


I have finally rewritten my artist's statement after plugging away on the dern thing off and on for over a year. As you can see, I had a little help from our cat Skimble, shown above expressing her editorial opinion of a rough draft. Check out the statement here: http://www.sanssoucistudios.com/artist.htm
There's also an updated picture of my my fatter, grayer, nerdier self (yes, I really did wait until my favorite anime T-shirt was fresh out of the wash to take the picture) but you're going to have to go to the website to see it!
Next, eBay! Stay tuned!
Sunday, August 12, 2007
Sans Souci Studios Website Updated!!!!

Here he is, the man of the hour, my wonderful husband Brian Wightman busily adding a guestbook to my website while folding laundry at the same time! Yay! What a guy! It helps that he just graduated from his M. Ed. program and has a little more time now for this sort of thing. (Yes, that is a pile of freshly laundered boxer shorts under his elbow.)
Check out the new site! http://www.sanssoucistudios.com/
I haven't had much time to work on masks this summer while my daughter has been home from school, sigh. Yeah, I know, enjoy them when they're little. I did manage to write up that "summary" (ha ha) about what I've learned about paper mache casting over the past year. http://www.sanssoucistudios.com/casting.htm Next on my list of things to do is to rewrite my artist's statement and open an eBay store! I am really looking forward to having some sort of regular sales outlet for my masks. Stay tuned!
Wednesday, June 20, 2007
Isabelle and All Species Day


All Species Day is a local holiday in the Central Vermont area, put on by local artists and consisting largely of young kids putting on homemade animal masks and costumes and marching from Hubbard Park down the main street in Montpelier. I personally haven't worn my masks in this celebration, as I want the focus to be on the work of the younger artist in the family! Here she is with this year's creation, a bear mask which her father helped her put together and she decorated. Last year she and her father made a sea horse mask. If nothing else, All Species Day makes for some great photo opportunities!
Thursday, June 14, 2007
Mask Shape and Warpage


As I've been casting different masks using papier mache strips, I've been noticing that the masks' overall shape has a lot do do with the degree to which they try to warp during drying.
Above I have posted pics of the backs and insides of a "Rip" mask, a "Rival" horse mask, and a little eyeball mask.
The "Rip" mask really wants to warp during drying. I believe it's because the mask has an overall cylindrical/conical shape with a wedge cut out of the bottom. I think papier mache strips tend to want to pull along curved surfaces as they dry. There is nothing to stop that pull along the bottom of this mask, so it warps. You can see that I wound up putting a triangular "plug" in the jaw to prevent this.
The horse mask "Rival" warps only a tiny bit during drying. I believe this is because the cylindrical/conical part of this mask is closed, and the open part on the bottom is circular. As the papier mache strips dry and try to pull, there isn't anywhere that they can move to. All the available space is filled.
The little eyeball mask does not warp at all during drying. It doesn't have much of a curved shape to it, and besides, it has 1/4" lip at a roughly 90 degree angle to the mask all around the edges. I believe the pull of the papier mache strips on this little lip cancel out the pull of those on main mask as they dry. This lip, while a tremendous pain in the butt to cast, also adds a lot of strength to the edges of the mask, which also helps to reduce the number of layers of paper I need to use.
In general, the more details a mask has (folds, wrinkles, bone structures, etc) the less likely it is to warp, as the details interrupt the pull of the strips as they dry. Conversely a smooth mask is more likely to warp, as little interrupts that pull.
Technicalities... but let me tell you, a warped mask is no fun!!!
Wednesday, June 13, 2007
First Horse Mask Cast!


Whoopee!!!!!!
Now to work on a way of attaching it to someone's head! I'm imagining Velcro-ing it to a snug fitting hood of sorts. Time to cozy up to my friends who can sew!!!
Large Multipart Papier Mache Mask Casts


I've spent the last month or so trying the papier mache strip method I'd practiced in my smaller 'eyeball' masks in larger, multipart molds. I've continued to use an initial detail coat layer of a Polyfilla/Weldbond mix, a second layer of cheesecloth with the Polyfilla/Weldbond mix, and subsequent layers of kraft paper and outdoor wood glue.
Some differences I've found in making small masks and large multipart masks this way:
1) I need to use much more care in the cheesecloth layer in a large mask than in a small one. There is more opportunity for overlapping layers of cheesecloth to build up thickness in a large mask, which does not contribute anything to strength, and can prevent the Polyfilla/Weldbond mix from penetrating all the way through to the mold. This can leave many pits and holes in the surface of the mask that will later need to be filled. I use extra care around deep and very detailed areas, and I try to overlap the cheesecloth just to be sure there is no gaps in coverage, but no more.
2) I need to use more layers of paper in large masks than in small ones. How many? It depends entirely on the shape and level of detail in the mask, with very detailed areas (wrinkles, lips, gumlines, etc) naturally being stronger and very smooth ones (cheeks, etc) being comparatively weaker. I still use only two layers of paper in areas with lots of detail, and up to ten in very smooth ones. I also use eight to ten layers of paper around the edges of the mask. A mask with enough layers will have only a slight amount of flex to it. I have found one sure way to know that I need more layers- if I put sealer on the mask, and it becomes limp and rubbery and then warps all to hell, I haven't used enough. Waaaahhhh!!!!!
3) Obviously, I need to join the pieces somehow or another. I'm not sure I'm done experiementing with this, but here's what I do now. I cast each piece of the mask seperately. I overhang the cheesecloth just a little over the edges of the mold and glue it down tightly, using a weaker glue such as Elmer's (no point in using a stronger glue which I'll just have to trim off later!) I do the same thing with one layer of paper in areas which I won't be able to reach into when the mold is closed (ears, tips of noses and lips, etc.) (You can see this cheesecloth edge in the pic of the unassembled mold above, and see the resulting "fringe" in the pic of the raw cast.) I have found, much to my great suprise, that this little edge of paper and or cheesecloth will not interfere with the mold assembly, as long as it is smoothly and tightly pressed down, and it is fairly easy to trim off afterwards with a craft knife. I then apply a bead of straight Weldbond to paper edges, a Polyfilla/Weldbond mix to the cheesecloth edges, clamp all the pieces of the mold together, and apply two more layers of kraft paper over the seams I can reach. Then I anxiously wait for the whole thing to feel dry, and unmold it!
In general, this method yields nice results. The masks are very light and strong, and the detail and finish are exceptional. The downside is that this method is extremely time consuming- it takes me fourteen hours to cast a "Rip" mask (the one shown above) this way, compared to eight for my infamous Paperclay slip/Sculpt and Coat method. I think the resulting quality is worth it, and I'm going to see if I can cut back on time spent elsewhere in production. I'm going to look into airbrushing, to see if I can spend less time painting!
Friday, April 13, 2007
Studio Hazards

This is Rumpleteazer, or as her close friends call her, The Teaze. Not what one would usually think of as a studio hazard. However, I have learned to make sure that 1) she is fed 2) she doesn't want to go out and 3) she isn't particularly starved for attention before I do anything that's at all tricky in my studio, such as casting. Otherwise, I might be trying to carefully maneuver some gluey strip of paper into the tiniest point of a tooth or an eyebrow when she tries to yank a finished mask by the strap off the counter and onto the floor. Or, stands up on her hind legs and sharpens her claws on my butt.
Saturday, April 07, 2007
Thou Shalt Not Fuss!!!

The skies opened up, the angels sang hosannah and pronounced....
THOU SHALT NOT FUSS!!!!!!
Why this sudden revelation? Well, I took out the mask the "eyeball" mold was made from and compared it to my recent casts, and realized about NINETY PERCENT of what I had been filling in and sanding out as casting flaws were present on the original. The Weldbond/Polyfilla mix is picking up that minute a level of detail. I have posted a closeup pic of a raw Polyfilla/Weldbond mask above, showing just how tiny these flaws are, and by extension just how anal I can be.
I have decided that if I was OK with those little flaws on the original when I dropped the big bucks and sent it off to the moldmaker, that by dadgum I was going to be OK with those little flaws on the casts as well. I have made a solemn promise to myself that I will not fix any of them from now on.
Holy instant time savings, Batman!
Friday, April 06, 2007
Yet More Materials Experiments


I continue to cast dozens of "eyeball" masks using variations on the good ol' fashioned paper strip and glue method of papier mache. (I'm up to my eyeballs in eyeballs..) I have come to the conclusion that this is simply the lightest, strongest method there is. Forget paper pulp and those fancy schmancy modern casting resins. Not to mention there's a certain kind of alchemy in the transformation of plain paper, something we take so much for granted, into a work of art.
However, this is still a more labor intensive method than most, and in an effort to save time and keep my prices down I have been experimenting with different materials for the detail coat, the initial layer which picks up detail directly from the mold. I'm hoping to get a mask that needs very little touch up, to save time on sanding, filling, repairing blemishes, etc etc.
Specifically, I have been experimenting with the following detail coats: 1) the chiesatine/cotton fluff method, as mentioned below; 2) thinned Polyfilla, reinforced after finishing with a brushed on layer of thinned Weldbond; and 3) a mixture of Polyfilla and Weldbond. I apply these into the mold and back them with a layer of cheescloth, glue and Polyfilla, and two or three layers of craft paper strips and glue. These steps are pictured above.
After much hurling and smashing of masks on the ground I have come to the conclusion that all these materials are more or less equally strong, AS LONG AS THEY ARE KEPT AS THIN AS POSSIBLE. Anywhere they build up to any thickness becomes a weak point, paper strip backing or no. Given that, the material which is quickest and easiest to use becomes the most desireable. For whatever reason the Chiesatine method takes forever, and the straight Polyfilla is too prone to marring before it's coated with Weldbond, which leaves the Weldbond/Polyfilla mix as the current champion.
Briefly, how I make the detail coat.. I thin the Weldbond down to the consistency of cream, and then use it to mix the Polyfilla into a thin, lump free, brushable mix. I test it on the outside parts of the mold rubber until I'm sure it's a good texture. If it's too thick, it has a ridgy, meringue like texture which will make the applications of the other layers unnecessarily difficult. If it's too thin, it will run and pool in the deeper parts of the mold. The right thickness will have relatively little texture and will stick on the vertical surfaces of the mold without slumping or running. Again, this needs to be applied IN AS THIN A LAYER AS POSSIBLE. I don't worry if this layer is so thin that it's somewhat transparent and I can see the orange of the rubber mold through it! The subesquent layer of cheescloth, Polyfilla, and glue will fill in any thin spots nicely.
When I've done a few more masks and worked all the kinks out, I hope to post in more detail about the paper strip paper mache method. Until next time!
Monday, March 12, 2007
Gratuitous Cute Pic Alert!

Isabelle decided she really wanted to paint masks one day, so I dug up this old Aves test mask and let her go to it. Glad those Aves masks are good for something!
Thursday, February 22, 2007
Cat Masks


Here are pics of three finished "Sophia" cat masks, named partly for "Wisdom" and partly for my mother's much loved mini-van sized feline, aka Sof the Loaf.
I had way too much fun painting these. Again I got to use some Golden Acrylic iridescent and interference paint, particularly on the main part of the white cat and in the eyes of the black and white cats. I'm in love with that pearly white color!
Masks at the Movies

Imagine my suprise when I was trying to unwind with a movie and not think about masks when I found the movie was actually about... MASKS.
I love Neil Gaiman. His Sandman graphic novels are some of my favorite books of all time. I also have a healthy respect for Dave McKean, one of several illustrators for Sandman. So I was pretty keen to see this movie for which Gaiman did the screenplay and McKean did the artistic direction. While it turned out that I was a little bored by the story, I though it was a real treat to see the masks designed by McKean.
Other mask movies. "The King of Masks", a story about a Chinese maskmaker in need of an apprentice, is one of my favorite movies of all time. I thought "Eyes Wide Shut", directed by Stanley Kubrick with masks designed by Guerrino Lovato (I took a class with him once!) was really, really, really, boring, although the masks were lovely.
However, I'm planning on sticking with anime for the near future for entertainment! Not that it's safe from masks, either, there was that vicious flesh eating Noh mask in "Inuyasha"...
"Scrutinizing Eyes" Masks


Here are pics of the first few finished casts of what is officially known as the "Scrutinizing Eyes" mask. Unofficially, it's called "Paranoid Eyeballs". The gold mask is the finished "Chiesatine" paper mache mask that I posted pictures of earlier, raw and fresh from the mold.
I got to play alot with Golden Acrylics interference and iridescent colors painting these. Way, way, way too much fun!
It's important to me that the mask moves well with the wearer, and the shifting colors of the interference paints in particular add to the mask's sense of movement. Plus, I'm hoping that in some cases they can save me a little time (and thus, production costs) as they can give me depth and interest in the color of the mask without devoting hours and hours to layering, glazing, and shading.
The Winning Mask

While I'm posting pics of my new masks, I thought I'd post this one of the "Rip" mask that won second place at "Face the Nation IV: A National Juried Mask Exhibition" at the Design Museum of the University of California Davis, January 2006. Here it is.
The first place winner was Ned Bear http://www.lib.unb.ca/Texts/QWERTY/Qweb/qwerte/ned_bear/ned.htm a First Nations maskmaker. I'd be thrilled to come in second to him any day!
The Attack of Shnozzola, or, The Practical End of My 35mm Camera


My main project the past few months has been to try to take some decent pictures of my masks for my website and other promotional materials. I splurged and bought all the photographic equipment I needed (seamless paper, a seamless stand, a reflector, a diffusion umbrella, etc) and set up a lovely little photographic studio in the basement. And then, while tripping over tricycles and stepping in cat poop (every fifth day or so is Litter Box Optional day among the felines here, it seems) I took my pictures. And retook my pictures. And retook my pictures YET AGAIN.
Observe Exhibit A, pictures of a "Sneer" mask, above. The bottom pic is taken with the mask as close to the camera as possible. The top pic is taken with the mask backed off from the camera, and then zoomed in with the telephoto lens. I had read about distortion in photos of three dimensional objects when the camera was too close, but, wow. Needless to say, I had taken pics of all my masks with the camera nice and close before I noticed this distortion was happening, and needed to take them all again.
So my original plan had been to take a set of digital pics with my digital camera, and then take a set of pics on real slide film with my conventional 35mm camera. But my digital camera has the telephoto lens and the 35mm doesn't. I don't want to spend tons of money to get a new telephoto lens. More and more galleries and shows are accepting mostly digital submissions, and I wonder if the day isn't coming soon when slides will be obsolete. And until then, there are places that convert digital pictures into slides. So this may be it, the day when I put my trusty 35mm on the shelf and say sayonara.
Subscribe to:
Posts (Atom)