Wednesday, November 17, 2010

SPA "Celebrate!" Member Show 2010


Once again I will have several masks on exhibit at the annual Studio Place Arts' "Celebrate!" members show in Barre, Vermont. The show runs from November 17th through December 31st, the opening reception being held on Saturday, November 20th from 4 t0 6 PM. There will be birthday cake as this is SPA's tenth anniversary! I'm planning on bringing a 2 1/2# shrimp ring myself, but if you want any you'd better get there early or I'll eat it all myself!


The White Rabbit mask above will be one of the masks I'll have at SPA. The White Rabbit has been keeping me busy for this entire year with commissions and such, who would have guessed rabbits would be so popular? It probably has something to do with Johnny Depp and that new Alice in Wonderland movie (haven't seen it yet). Friends also tell me that steampunk is all the rage now, so costumes that have a vaguely Victorian flavor are in vogue. Especially rabbits in waistcoats, apparently.


Studio Place Arts is a community center for the visual arts that has operated in Central Vermont for the past ten years. Located in a building that was once considered a "blight spot" in downtown Barre and nearly torn down, SPA now houses numerous artists' studios, holds eclectic art exhibitions and offers a wide range of arts and crafts classes to the community. For hours and more information, please visit http://www.studioplacearts.com./

Hope to see you there!

OMG! It's the KILLER FROG!!!!!


Killer Frog is a local legend. He was a Christmas gift to Isabelle from her great aunt Margie, a beautiful enameled rhinestone-studded frog-shaped jewelry box that developed an insatiable appetite for Playmobil people. He was also the inspiration for my husband Brian's Halloween costume this year.

It was interesting to turn a noob loose in my studio and see what they would do with my methods. As can be seen below, Brian first sculpted a frog mask sketch on the miniature armature, and then the actual mask sculpture on the life-sized armature.


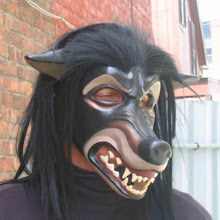
Being the devoted spouse that I am, I positive-cast and assembled the mask for Brian, and he painted and finished it. Here he is modelling it wearing his very appropriate "Get Green" painting shirt. You can tell from the fangs that he's Killer Frog and not, say, Toad from The Wind in the Willows or Toad or LeFrog from Flushed Away.


And in other news, we've had some personnel changes here at Sans Souci Studios. Here is our new kitten and administrative assistant, Ezzy, whom we adopted for Isabelle's birthday at the local animal shelter. As you can see he's already getting into the swing of things.


And on a more solemn note, our own black Halloween kitty, Skimble, shown sitting with Isabelle below, passed away suddenly but peacefully in a favorite sunny spot a week ago. She had been a stray with many old injuries, and I guess her body was just too worn and tired out to go on anymore. She is badly missed.

Wednesday, September 01, 2010

Positive Casting a Rabbit Mask with Celluclay

Usually I make masks by negative casting, that is, casting *inside* of a mold. But since I've been getting requests for rabbit masks faster than I can have a mold made, I've been making them by positive casting, ie, casting them *outside* of a form, in this case the original plasticene sculpture. Here's more about this method.

First, I liberally apply Vaseline to the sculpture as a release agent. Then I mix Celluclay (a kind of commerial paper mache pulp) and roll it out into approximately 1/8" thick sheets between two pieces of wax paper. These I put into the freezer for 8 minutes to make them less sticky and easier to work with, and then I peel the wax paper off and apply the sheets over my sculpture. I blend the edges of the sheets together and smooth out any major lumps, but otherwise I don't fuss too much over the texture. It's much easier to deal with after the Celluclay is dry.

The cast will need to be cut into pieces in order to remove it from the original sculpture. After I apply all the Celluclay, I make score marks along the parting lines with a clay tool. Otherwise, the Celluclay would be very difficult to cut apart when it is dry.

Then I set the mask in front of a fan to dry. Usually after an hour or two the Celluclay will start to feel leathery and I'll be able to add a little more detail back in with a wooden clay tool. After a day or two it is usually dry enough to remove from the sculpture.

Here's the beginnings of the cast, with the score lines pressed in:


Here's the cast with one of the pieces removed and the original sculpture showing underneath:


Here's all three pieces removed from the sculpture, ready for assembly:


At this point speed is of the essence. I reassemble the pieces as quickly as possible, as if I leave them for any time they will warp out of shape and not fit together well. I make holes along the edges of the pieces, lining them up with each other on either side of the seams. If the pieces are still a little damp I can make the holes with a bamboo skewer, if they've dried more thoroughly I'll need to use a drill.

Then I tie the pieces together using twist ties (I save these compulsively) and apply glue all along the seams:


I dry the cast on a wig stand or stuff it with wadded up newspaper to help it keep its shape. Then I fill in the seams and any thin spots with more Celluclay and let it dry again.

After I've gotten a sturdy shell on which to build, I begin to add texture and refine detail, both by adding back on with wet Celluclay or by carving with a Dremel. Here's the rabbit mask with the beginnings of hair texture, created by adding a thin layer of wet Celluclay and working it with a wooden clay tool:


Here's the mask hairier and more refined. The brown marks around the eyes are scorch marks from the Dremel.


Hairier and more refined still:


Then painted and finished! The Celluclay will need to be sealed before it is painted, as it will absorb humidity and warp like a son of a gun otherwise. I brush on a layer, inside and out, of slightly diluted Weldbond (a kind of waterproof PVA glue) to do this.


As you can see, in a positive cast, much of the original sculpture's surface detail (hair, wrinkles, etc) is lost and needs to be added back in. How much detail is lost depends on the material used- a lot with Celluclay, but less with leather and other types of paper mache. In a negative cast, surface detail is preserved by the mold. This is the major reason why I use molds to reproduce most of my masks. However the fur texture on this mask is fun to create by hand, and I play with the original rabbit sculpture a little every time I make a new positive cast, mostly tweaking its fit. Positive casting also allows me to go more quickly from an original sculpture to a wearable mask, since there isn't the intermediary step of having the mold made. Plus, it's always good to have more than one tool in the tool box!

Tuesday, August 31, 2010

Summer 2010: The Battle of the Basement


Who would guess that beneath the idyllic exterior of Sans Souci Studios would lie these scenes of horror?


This is my basement. The table in the third pic is my workbench. The cobwebs and white powder all over the table is paper mache dust from my dremelling. This mess has not been cleaned for nearly THREE YEARS. This, needless to say, was one of my major projects this summer.

There was one major obstacle and one major incentive to cleaning the basement. Here's the obstacle:


This is the electric bamboo bike my husband has been building. It lives next to my workbench, and its parts are often scattered among my tools. I would need to pick them up in order to clean my workbench. In a fit of wifely pique I have not touched them, and in a state of husbandly obliviousness the spouse hasn't either. This stalemate lasted for two years. (For more about hubby's bike building adventures, visit idledad.blogspot.com)

Here's the incentive:


This is Skimble, who as a stray suffered severe abuse. She has a huge bald scar on her back from where kids poured boiling oil on her, and she has an inoperable smashed hip, presumably from being kicked or hit by a car. The long and the short of that is, her rear end hurts her all the time. She associates her litter box with pain and does not like to use it. Either that or she just has a bad attitude. In any case, when I cleaned the basement I found she had peed on 1) rope 2) sponges 3) work gloves 4) insulation scraps 5) packing peanuts 6) cardboard boxes and (drumroll please) 7) the snow shovels. One major incentive for cleaning the basement was a much better smelling work environment!

I did make one major materials-related discovery- paper mache dust, like cat urine, glows purple under black light. So, unless the spots were also still damp and smelly, I couldn't be entirely sure if they just needed sweeping or blasting with Nature's Miracle. I wound up washing the entire floor. I figured after three years, it wouldn't hurt anyway.

Wednesday, August 25, 2010

The Elkha Fall/Winter 2010 Catalog

Here's a use for my masks I hadn't imagined before! The following are pictures from the 2010 fall/winter catalog of a boutique men's and women's clothing label called Elkha, based in Melbourne, Australia. The deer mask is an earlier, unpainted version of the one I've been working on this summer.


I love the way masks seem to take on a life of their own and do things I never would have guessed they would once they leave my hands! That's one way that to me, masks are a particularly alive form of art.

For more information about Elkha, click here

Tuesday, June 22, 2010

Antlers

I have been working on the antlers for my deer mask for the past several months, in particular on attaching them in something less than a ridiculous manner. In my mind, a deer mask is largely an excuse for a human to wear antlers, so the antlers must look good. If the antlers look "off" the whole mask will look wrong.


(Gratuitous cute pic alert!!) I started making my antlers by tracking down this set of real whitetail antlers in the wilds of eBay. Whitetail antlers in particular are more on a human scale, as opposed to say, mule deer or fallow deer antlers, which can be huge. I made a paper mache version of these antlers by taking a positive cast of them in Celluclay. (For more about this method, see this post here.)


I also needed plenty of reference photos, for which this book (found on the clearance table at a local bookstore) was my main source. The picture on the cover is particularly helpful. (Gratuitous factoid alert- I also learned from this book that antlers are the fastest known growing tissue in the animal kingdom, growing at a rate of half an inch a day.)


And here we have the first attempt to attach the cast Celluclay antlers to the mask. If you compare this photo with the photo on the book above, you can see that the two short tines in the center of the rack are too short, spaced too widely and make too much of a "V" shape. You can also see that the two main beams are too horizontal. In the reference pic above, the beams are more vertical and have a gentle, shallow "C" shape.


Attempt number two. Here the beams are more upright and starting to take on some of that "C" shape, but the tips are too close together, nearly meeting over the center of the mask while on the real deer, the tips line up roughly with the middle of the ears. The ink sketch superimposed over the photocopy demonstrates this.


Attempt number three. The two middle tines have been lengthened and straightened, and the right hand antler has the "C" shape I've been trying for. However, two of the tines of the left hand antler are too short and straight, and something very funky is going on with middle of the beam. The photocopy/ink sketch of the top view shows that the curve of the beam needs to be tightened, and the end needs to move forward.


Attempt number four. I've lengthened and curved those two short straight tines on the left hand antler. I've also started to tighten the curve of the beam of the left hand antler, particularly towards the back of the mask, but in doing so I have once again moved the tip of the antler too close to the center of the mask. As the top view photocopy/ink sketch shows, it needs to be moved out again, and perhaps shortened.


And, here is the mask in its current state. At this point I'm happy with the overall look of the antlers, though the left hand antler has some weird lumpiness going on that needs to be addressed. Next I need to define and refine the mask's overall texture. Then, off to the moldmaker!

(Gratuitous factoid alert- on a trip to Wikipedia to check that my antler terminology above was correct, I learned it is now believed antlers act as parabolic reflectors, vastly improving the hearing of their wearers. I'm not kidding. We'll see if paper mache antlers can do the same!)

Wednesday, June 16, 2010

Open Studio Wrap Up

The Vermont Crafts Council Open Studio Weekend is over and done for another year! I enjoyed meeting all the visitors to my studio, artists and families and customers alike.


The above is a photo of me that appeared in the Sunday, May 3o edition of the Times Argus for Open Studio Weekend. (Looks like the clay sketches are thinking about taking on the photographer.) There was also an interview with me about Open Studios in the May 20th edition of the Montpelier Bridge, you can read it here: http://www.montpelierbridge.com/May20-10Bridge_1-14.pdf (You'll have to cut and paste this address into your browser, as this link is giving Blogger fits. My interview is on page 6.)

And yes, of course... the winner of this year's Mask Giveaway was Richard Andrecen of Hinesburg, VT! Congratulations! The mask is already on its way!

Friday, May 14, 2010

The 2010 Open Studios Weekend Mask Giveaway!


I will be giving a mask away again this year for The Vermont Crafts Council Open Studio Weekend! To have a chance at winning a mask, you can either visit in person on Open Studio Weekend and sign the guestbook with your name and address (I have to have a way to contact you if you win!) OR sign up online to either Follow my blog or suscribe to it via Feedburner. Current blog Followers, Feedburner suscribers, or people on my mailing list are already automatically entered! I will draw one name at random on June 15, 2010, and the winner can have thier choice of one of the two masks pictured above (or similar).

Good luck and looking forward to seeing you!

Friday, May 07, 2010

All Species Day 2010

I've been quiet on my blog lately, holed up in my studio working on the deer mask and trying to attach the %&$#@!!! antlers in a somewhat less ridiculous fashion. Fortunately the junior maskmaker at Sans Souci Studios has been more visible.


Here is Isabelle modeling the jaguarundi mask that she and her father made together for this year's All Species Day. Incidentally her stuffed kitty "Sneeky Peeky" is dressed up as a person.


Jaguarundi? It's a South American wild cat. Isabelle is way into cats, and we're guessing she likes the way the word 'jaguarundi' rolls off the tongue.

All Species Day? It's a yearly pageant held on the first Sunday in May, put on by local artists and consisting largely of young kids wearing homemade animal masks and costumes marching from Hubbard Park to the lawn of the Capitol Building in Montpelier.


And, as you can see, the occasional grownup dressed as a Na'vi.

Thursday, April 29, 2010

Ooops

Whoops, I realized I entered in LAST YEAR'S dates for Open Studios- the dates are in fact May 29 and 30, Memorial Day Weekend! Pardon my brain cramp there!

Tuesday, April 27, 2010

Vermont Crafts Council Open Studio Weekend 2010


Sans Souci Studios will again be open to visitors for the Vermont Crafts Council Open Studio Weekend this year, on May 29 and 30, 2010, from 10:00 AM to 5:00 PM. Come learn about maskmaking methods and see finished masks available for sale!

The Vermont Crafts Council Open Studio Weekend was named one of Vermont's Top Ten Summer Events in a competition held by the Vermont Chamber of Commerce in 1997. Nearly 300 artists and craftspeople in all imaginable media from across the state participate. The Vermont Crafts Council publishes The Vermont Studio Tour Guide, a free map booklet with directions to over 260 participating sites, which is available at Vermont Information Centers, from individual studios and galleries, and by request. Additional information about Open Studio Weekend can be found online at http://www.vermontcrafts.com/ or by calling the Vermont Crafts Council at 802-223-3380.

Hope to see you there!