


I've spent the last month or so trying the papier mache strip method I'd practiced in my smaller 'eyeball' masks in larger, multipart molds. I've continued to use an initial detail coat layer of a Polyfilla/Weldbond mix, a second layer of cheesecloth with the Polyfilla/Weldbond mix, and subsequent layers of kraft paper and outdoor wood glue.
Some differences I've found in making small masks and large multipart masks this way:
1) I need to use much more care in the cheesecloth layer in a large mask than in a small one. There is more opportunity for overlapping layers of cheesecloth to build up thickness in a large mask, which does not contribute anything to strength, and can prevent the Polyfilla/Weldbond mix from penetrating all the way through to the mold. This can leave many pits and holes in the surface of the mask that will later need to be filled. I use extra care around deep and very detailed areas, and I try to overlap the cheesecloth just to be sure there is no gaps in coverage, but no more.
2) I need to use more layers of paper in large masks than in small ones. How many? It depends entirely on the shape and level of detail in the mask, with very detailed areas (wrinkles, lips, gumlines, etc) naturally being stronger and very smooth ones (cheeks, etc) being comparatively weaker. I still use only two layers of paper in areas with lots of detail, and up to ten in very smooth ones. I also use eight to ten layers of paper around the edges of the mask. A mask with enough layers will have only a slight amount of flex to it. I have found one sure way to know that I need more layers- if I put sealer on the mask, and it becomes limp and rubbery and then warps all to hell, I haven't used enough. Waaaahhhh!!!!!
3) Obviously, I need to join the pieces somehow or another. I'm not sure I'm done experiementing with this, but here's what I do now. I cast each piece of the mask seperately. I overhang the cheesecloth just a little over the edges of the mold and glue it down tightly, using a weaker glue such as Elmer's (no point in using a stronger glue which I'll just have to trim off later!) I do the same thing with one layer of paper in areas which I won't be able to reach into when the mold is closed (ears, tips of noses and lips, etc.) (You can see this cheesecloth edge in the pic of the unassembled mold above, and see the resulting "fringe" in the pic of the raw cast.) I have found, much to my great suprise, that this little edge of paper and or cheesecloth will not interfere with the mold assembly, as long as it is smoothly and tightly pressed down, and it is fairly easy to trim off afterwards with a craft knife. I then apply a bead of straight Weldbond to paper edges, a Polyfilla/Weldbond mix to the cheesecloth edges, clamp all the pieces of the mold together, and apply two more layers of kraft paper over the seams I can reach. Then I anxiously wait for the whole thing to feel dry, and unmold it!
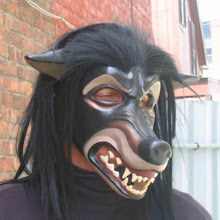
In general, this method yields nice results. The masks are very light and strong, and the detail and finish are exceptional. The downside is that this method is extremely time consuming- it takes me fourteen hours to cast a "Rip" mask (the one shown above) this way, compared to eight for my infamous Paperclay slip/Sculpt and Coat method. I think the resulting quality is worth it, and I'm going to see if I can cut back on time spent elsewhere in production. I'm going to look into airbrushing, to see if I can spend less time painting!
1 comment:
I just checked out your etsy store. I love the masks, but thought it a shame that you could still see the man's face with the unicorn "hat." I would drape some fabric with mesh eyeholes to cover the face to sell it for a mask. I was daydreaming that the mesh could actually be the same color as the unicorn head. Any way, I am a fan of your work and figured you might like a suggestion if it was good enough.
Post a Comment