

First, I made a clay sketch on a miniature armature, to get a basic idea of masses and shapes without having to shove around pounds of plasticine. I then used this little sketch as a reference for the full sized sculpture.

Here we are fifteen minutes into the big sculpt, and Arnold the Armature is picking up your signal loud and clear. Those little bitties on the sculpting table in front of him are snails, frogs and slugs that Isabelle sculpted after sneaking into my studio one day.

End of Day One. The armature is covered and the resulting lump is somewhat rabbit shaped.

End of Day 2. Looking a little more rabbit shaped. The little clay sketch I made at first is visible in the background.

End of Day 3. Ready for liftoff! Muzzle and brows have also been refined.

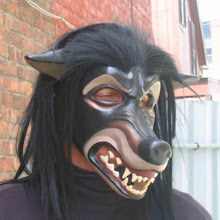
End of Day 5. Per customer's request, ears restrained, cheeks narrowed down and eyebrows refined some more. At this point I am pretty much satisfied with the sculpture.
During this project I discovered some amazing new time saving sculpting tools- the digital camera, the scanner, the printer and my lightbox. At the end of each day I would take pics of the mask, print them out in black and white, and sketch changes over them I'd want to make the next day. This helped me stay focused and saved hours of needless fiddling.


These are two sketches I did to show my customer ideas for new ears and cheeks. He opted for ears somewhat between these two possibilites.
I also found that if I took pics of the mask on one side and then kept the tripod and the stand in one place, I could spin the stand around and get a picture of the other side of the mask that when flipped over, would line up very closely to the first. Then I would print out both pictures, trace around the major lines in red, flip one picture over and then lay them down on my lightbox to see any significant differences between the two sides. This was very helpful if one feature looked "right" one one side but "off" on the other, I could tell right away what the difference was.

A pic of the right hand side of the mask, outlined in red, with an area from the left hand side superimposed in green over part of the ear.

A pic of the left hand side of the mask, outlined in red, with an area of the right hand side of the mask superimposed in green over the eye.
So I had a sculpture I liked after only twenty one hours of work, which is far as I'm concerned is unprecedented.
Next, casting and painting the mask!
No comments:
Post a Comment