Wednesday, November 11, 2009
SPA Member's Show 2009
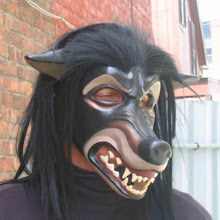
Once again it's time for the Studio Place Arts' annual Member Show, and once again my masks will be there for your viewing pleasure. The show is from November 17 through December 31, and the reception is on Saturday, November 21, from 4 to 6 PM.
Studio Place Arts (or SPA, as it's known to its friends) — is a community center for the visual arts that has operated in Central Vermont for more than eight years. Located in a building that was once considered a "blight spot" in downtown Barre and nearly torn down, SPA now houses numerous artists' studios, holds eclectic art exhibitions and offers a wide range of arts and crafts classes to the community. For more information about SPA, please visit http://www.studioplacearts.com./
On a side note, I scared my poor cat Teaze half to death getting ready for the show. She came tearing in from outside, already terrified of the vactor cleaning the storm sewers outside, and encountered the wolf mask on the floor in the foyer, on its way out the door to the show. She screeched to a dead halt, froze in place with all her hair standing on end, and then turned and went shooting upstairs. She was anxious about coming in the door for the rest of the day. While I feel bad for her, I think it was quite an endorsement for my mask!
Labels:
studio announcements,
wolf masks,
work for sale
Wednesday, October 21, 2009
White Rabbit Mask Commission Part 2
During our last thrilling episode, our bold heroine had just finished a mask sculpture in a blazingly fast twenty one hours. Tune in this week to see if she can actually make a mask before Halloween!
I positive cast the mask in Celluclay over the plasticine rabbit sculpture and let it dry with the help of a fan. Then I cut it off, reassembled it, filled the seams and added the hair texture with more Celluclay. I just got a new batch of Celluclay and don't know if it's because it's been reformulated or just because it's fresh and new, but it was so much smoother and took texture so much better than it has before. (For more about positive casting, see this earlier post here)
Here is the mask with texture freshly applied. The hair on the nose and muzzle looks rather schnauzer-ish, so I later sanded it down.
Here is Brian the hapless hubby modelling the mask with the flash going off in his eyes. I've tamed the hair texture somewhat, as well as sanded down the eyes, the nose, and inside of the ears. At this point I deemed the mask was ready for paint!
The customer sent me this wonderful traditional Aurthur Rackam illustration for ideas for colors.
I love this color scheme, with the creamy/yellowy white, the sepia undershadings, and brownish/reddish eyes and nose. That is one seriously wierd looking bunny though!
And.. (drumroll please).. the finished mask!
I added just a tiny bit of metallic copper paint to the irises, so that the eyes will flash when the customer moves his head. Overall I'm really pleased with how this mask came out.
And... as an added bonus, this is the only Sans Souci mask to date that is really two masks for the price of one. What a deal!
Labels:
finished work,
mask how-tos,
rabbit mask,
works in progress
White Rabbit Mask Commission Part 1
A challenge! A customer asked me if I could make an Alice in Wonderland White Rabbit mask for Halloween. I had only a month, and I usually need around a hundred hours to finish a sculpt, often more, and at least twenty or thirty to make an actual mask. I really didn't think I had time, but I had also wanted to make a rabbit mask anyway and see if perhaps, in the two or more years it's been since I've started a new sculpt, I'd become more proficient. So I took it on.
First, I made a clay sketch on a miniature armature, to get a basic idea of masses and shapes without having to shove around pounds of plasticine. I then used this little sketch as a reference for the full sized sculpture.
Here we are fifteen minutes into the big sculpt, and Arnold the Armature is picking up your signal loud and clear. Those little bitties on the sculpting table in front of him are snails, frogs and slugs that Isabelle sculpted after sneaking into my studio one day.
End of Day One. The armature is covered and the resulting lump is somewhat rabbit shaped.
End of Day 2. Looking a little more rabbit shaped. The little clay sketch I made at first is visible in the background.
End of Day 3. Ready for liftoff! Muzzle and brows have also been refined.
End of Day 5. Per customer's request, ears restrained, cheeks narrowed down and eyebrows refined some more. At this point I am pretty much satisfied with the sculpture.
During this project I discovered some amazing new time saving sculpting tools- the digital camera, the scanner, the printer and my lightbox. At the end of each day I would take pics of the mask, print them out in black and white, and sketch changes over them I'd want to make the next day. This helped me stay focused and saved hours of needless fiddling.
These are two sketches I did to show my customer ideas for new ears and cheeks. He opted for ears somewhat between these two possibilites.
I also found that if I took pics of the mask on one side and then kept the tripod and the stand in one place, I could spin the stand around and get a picture of the other side of the mask that when flipped over, would line up very closely to the first. Then I would print out both pictures, trace around the major lines in red, flip one picture over and then lay them down on my lightbox to see any significant differences between the two sides. This was very helpful if one feature looked "right" one one side but "off" on the other, I could tell right away what the difference was.
A pic of the right hand side of the mask, outlined in red, with an area from the left hand side superimposed in green over part of the ear.
A pic of the left hand side of the mask, outlined in red, with an area of the right hand side of the mask superimposed in green over the eye.
So I had a sculpture I liked after only twenty one hours of work, which is far as I'm concerned is unprecedented.
Next, casting and painting the mask!
Sunday, October 04, 2009
New Cat Mask
Finally, a new cat mask in my Etsy store! I am extremely pleased with this mask. I used Titebond III Ultimate Wood Glue, a kind of waterproof wood glue, for the first time when I cast this mask. I had bought cases of Weldbond Outdoor Wood Glue which much to my displeasure went bad in storage, so I had to run out to the hardware store to try whatever outdoor wood glue they might have on hand- and it might have turned out to be a very fortunate thing! The Titebond is very, very thin and watery, which might seem like a disadvantage but... it was not necessary to mix it with any water to cast with it, so I got next to no warping. The three pieces of the mask dried fairly true to shape, all the seams went together well, and there was much less refinishing work than usual- hurrah!
So I believe my store is relatively well stocked for Halloween. Now I just need to decide what I'm going to be when I go out trick or treating!
Labels:
cat masks,
halloween,
mask materials,
work for sale
Thursday, September 17, 2009
Sans Souci Studios in Japan!
I was thrilled to recieve these pictures of my masks from a customer at the Design Festa in Tokyo this past May!
It was a particular thrill for me to have masks in Japan, as I am learning to speak Japanese (as of today, on Unit 20 of Pimsleur Japanese II!) and a huge anime fan (just finished Death Note, great show!) According to my customer, the Design Festa is held twice a year and is one of the largest arts and crafts shows in Asia. To learn more about it, check out this website: http://www.designfesta.com/index_en.html
Thursday, September 03, 2009
What I Did Over Summer Vacation
My focus this summer, whenever I could get into my studio, was to try build the stock back up in my Etsy store and replace the five masks I sold recently: one for use in the dance festival in HI(see previous post); one for use in a music video in NY, and three for use in a culture festival in Tokyo. Here are my efforts so far.
This cat mask will be my last mask made of Celluclay. I had to try Celluclay just one more time, and I found that not only are Celluclay masks heavier- this mask weighs in at two pounds, over four times as heavy as the same mask made of paper strips and glue- but they don't really take all that much less time to make. Because it's so heavy I offered it for sale at a significant discount in my Etsy store. Maybe I should have offered it at less of a discount, as it's on its way to a new home already.
I love this unicorn mask. I confess when I first got this white Kanekalon hair I thought it was so ugly I stuck it in a cabinet and left it there for years, but I love the way it looks here, that stark flossy white contrasting with the pearly white of the head. I'm tempted to keep this mask.
And here we have Sneer, my grinning wolf mask, with a cool punked out new 'do. The long mixed black and red hair is commerical hair used for extensions; the short black hair represents my efforts to make peace with my new sewing machine and learn to weft hair myself. For those of you who are dying to learn to weft your own hair (or just figure out what the heck that means) check out this very informative article: http://www.nonidolls.com/weft.html
To tell the truth, it was amazing I got anything at all done this summer, considering this was going on outside my studio window through much of it:
It was almost impossible to concentrate with the backhoe working mere feet away and the entire house shaking. But,contractors who previously wouldn't even return our calls were lining up to give us quotes and schedule dates to start work on our long neglected front stairs and retaining walls, so we finally got that work done. I guess the McMansion market has dried up a little.
Before pic:
During pics:
After pic:
I am very happy with how the work came out.
It was also amazing I got any work done given the number of wonderful, refreshing trips we got to make this summer, not that I'm complaining! We went to the Sterling Renaissance Festival in NY:
And to the Cape:
Doesn't my hair look positively carnivorous in this pic??
And also on a camping trip in Groton State Forest here in VT.
So now that I'm all relaxed and refreshed and have a newly renovated house to work in, it's time to get back in my studio! Next on the to-to list is another cat mask to replace that one that just sold. Until next time!
Wednesday, July 01, 2009
Sans Souci Studios and the PUJA Gods and Monsters Dance Concert
Willow Chang http://www.willowchang.com/ and Passport Productions presented the annual PUJA Gods and Monsters dance concert on June 6 and June 7 at the WCC Paliku Theatre in Kaneohe, HI, which included performances by Anasma from France, Meissoun from Switzerland, Eduardo Rodrigues from Argentina as well as an appearance by Sans Souci Studios' wolf mask "Sneer"! I was just thrilled to pieces to have had my work included in this performance. I think right now I'd consider it a high point in my career!
Check out photographer Joe Marquez' beautiful pictures of my mask in the performance:
http://www.thesmokingcamera.com/puja_dance_concert_2009/h1f5b0887#h1f5b0887
The dancer wearing the mask is Eduardo Rodriguez from Argentina. I am just amazed at how his performance has transformed the mask into something so completely beyond what it was when it left my studio. Eduardo Rodriguez is currently on tour with Cirque du Soleil's Saltimbanco. To learn more about him see these articles: http://latinalista.net/honolulu/2008/10/cirque_du_soleil_honolulu_performance_fe.html and http://www.cirquedusoleil.com/en/shows/saltimbanco/show/acts.aspx
Thursday, April 23, 2009
Revisiting Celluclay with Isabelle
First of all, I just have to get it out of my system... isn't Isabelle cute? She's so much bigger than the last time I posted her pics here.
Anyway. Isabelle has been coveting the new "Scrutinizing Eyes II" masks and has asked me repeatedly for one to paint. They take so long to make I hesitated to give her one, but then I figured it might be a good opportunity to try out some new casting methods I'd been thinking of. So for the first time in about eight years I cast masks with Celluclay, a commercial paper mache pulp.
Celluclay has one significant advantage of traditional glue and paper strip paper mache- it is about a thousand times quicker and easier to use. The glue and paper strip "Scrutinizing Eyes II" masks take 9 to 10 hours to cast and finish, but similar Celluclay masks takes about 3 to 4 hours to cast and finish. Theoretically, anyway, assuming the process results in a viable mask. Which in the past it hasn't.
There's been a number of reasons. First of all, I believed that Celluclay warps more easily than other kinds of paper mache. Now I'm not so sure that's true. Yes, some of the early masks I made with it did warp, but I've since learned things that could have prevented this. Such as, a paper mache mask that is not sealed properly will warp no matter what, and acrylic gesso does not seal anything, while Sculpt and Coat or diluted Weldbond PVA glue does. I've also learned that the shape of a mask will influence how it warps just as much as the materials it's made from, and some shapes just require special handling. (For more about this, see this post here: http://sanssoucistudios.blogspot.com/2007/06/mask-shape-and-warpage.html )
Another issue has been Celluclay's apparent inability to adhere to my detail coat of choice, a mixture made from Weldbond, Polyfilla and cheesecloth. (For more about my detail coats, see this post here: http://sanssoucistudios.blogspot.com/2007/04/yet-more-materials-experiments.html) But then came the big "duh" moment.. I was using actual glue- Weldbond, a kind of Elmer's on steroids- to adhere the paper strips to my detail coat, while I was relying on the dried powdered glue in the Celluclay mix to do the same job. I was comparing apples to oranges! What would happen if I used real glue?
So I cast two test masks. First I cast my detail coat into the mold and let it dry thoroughly. Then I thinned Weldbond with just enough water to make it mixable and added it to Celluclay, which I then used to fill the mold. Then I set it aside to dry, and waited, and waited. Then I remembered that Celluclay packed in thick layers in a rubber mold will NEVER dry. I put the mold under a fan and waited several days, and even then it only dried on the surface. When I finally demolded it, some of the surface of the mask stuck to the mold and pulled off. Paper mache generally doesn't stick to rubber molds, but it sure as heck will stick to a rubber mold better than it will to water! The damage was repairable, but it was still a hassle. Best to be avoided.
So for the next mask, I tried applying a layer of Weldbond over the detail coat, adding a THIN layer of Celluclay over that, letting it dry, and repeating this process about three times. I did not mix the Celluclay with anything other than water, as I didn't think I could handle the thin layers if they were too sticky. The mask dried fine in the mold, and none of it stuck to the rubber, but I did get a curious slight wrinkling effect on the surface. I suspect the Celluclay pulled at the detail coat and wrinkled it up as it dried. I haven't quite figured out what I'm going to do about this yet, if I'm going to worry about it at all- it is fairly subtle, and I suspect I could sand a lot of it out if I were motivated.
So in the end the Celluclay did not warp any more than the paper strips did, and ultimately it did adhere well to the detail coat. The biggest downside of Celluclay that I now see is its weight. A Scrutinizing Eyes II mask made with paper strips weighs only one ounce, while a similar Celluclay mask weighs three. Just for comparison's sake, a fairly normal pair of prescription glasses weighs one ounce, while the great big huge honking Coke bottle pair you will never catch me wearing on this blog weighs two. Still, it's possible for certain well-balanced, helmet-type masks that are inclined to stay on of their own accord anyway, that the Celluclay could work quite well.
So the moral of the story is that Celluclay is once again a possibility. Stay tuned!
The Other Resident Maskmaker At Sans Souci Studios
I'll take a minute to show off the work of the other resident maskmaker at Sans Souci Studios, my daughter Isabelle, who is now five and a half. Here goes!
This is a rabbit mask.
And a kitty mask.
This is a scary ghost mask.
And here we have a horse mask. It's been strapped with curling ribbon.
Another kitty mask. Check out those eyelids and eyebrows- aren't they awesome?
And the piece de resistance, Isabelle's scary monster mask!
These do have a certain something to them, don't they? Isabelle often makes these for me when I'm grouchy and I need to cheer up!
Subscribe to:
Posts (Atom)